How to Use the Squarespace Form File Upload Feature [2025]
As a business owner, there are several reasons why you may need to receive file submissions from your website visitors via your Squarespace website.
What if we told you this was possible with just a few steps?
The Squarespace form file upload feature allows you to collect more than just text-based info; you can now receive jpegs, PDFs, documents, and more!
Although this feature isn’t available on Squarespace sites by default, a popular method makes it possible. Namely, the Dropbox File Request feature allows you to add a link to a form field.
In this guide, we’ll take you through the process step-by-step so you can get your website visitors to submit files in no time. Ensure you read to the end to discover how to optimize your Squarespace file upload form, best practices for managing file uploads, creative uses of the file upload form, and how you can boost inbound leads for your business by optimizing your website for SEO using our plugin!
How to Add a Dropbox File Request Link on a Squarespace Form
One way to set up a file upload form on Squarespace is to use Dropbox’s File Request feature. All you need to do is create a file request in your Dropbox account and add the link to a button in your form. Visitors can then click the button and upload their files directly into your Dropbox.
Let’s walk you through how to set this up on Squarespace.
Stage #1: Creating a Form
The first thing to do is to add a Squarespace form to your page. To do this, navigate to the page you want the form on and click the “EDIT” button.
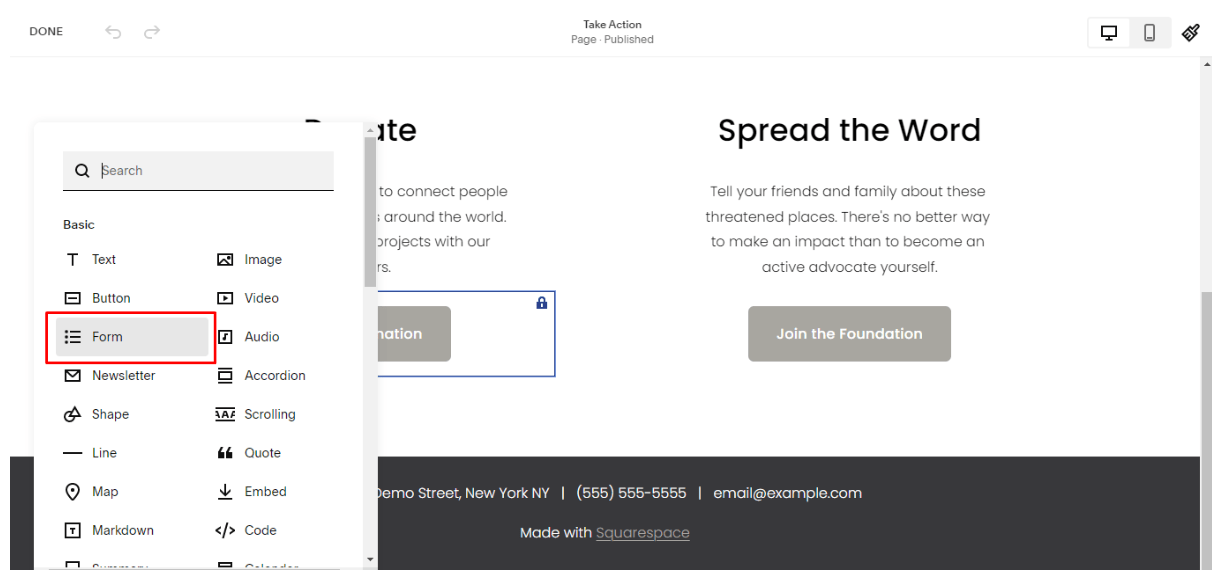
Now, scroll to the section you want the form on, and click the “+ ADD BLOCK” button to add a new BLOCK.
Next, select “Form” from the list.
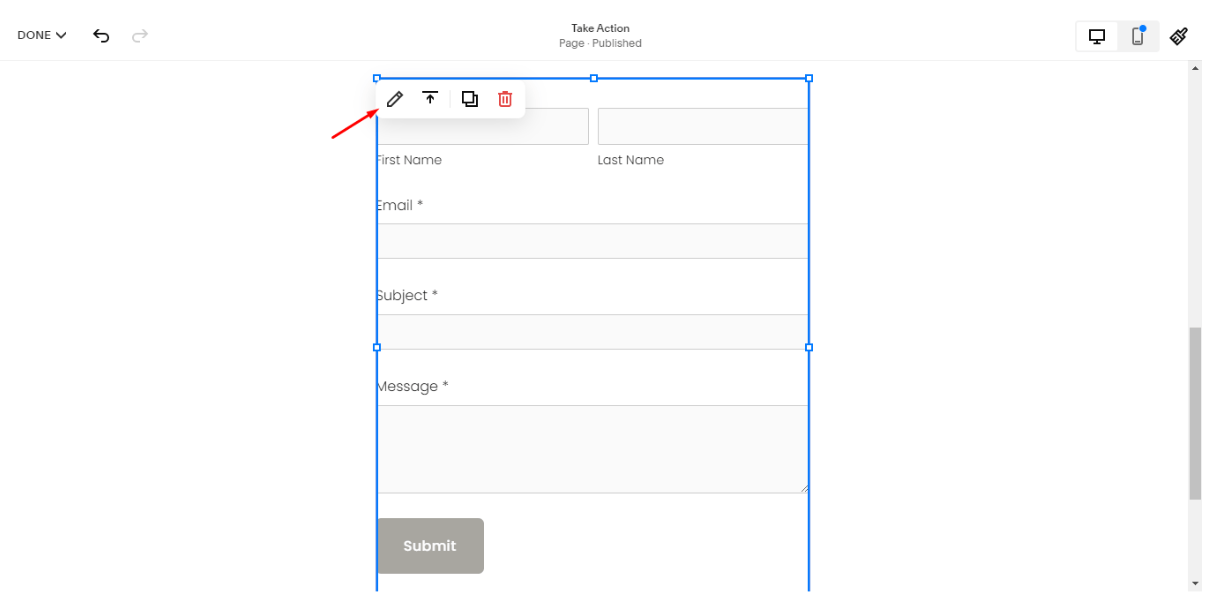
To edit your form, select the “Pencil” icon.
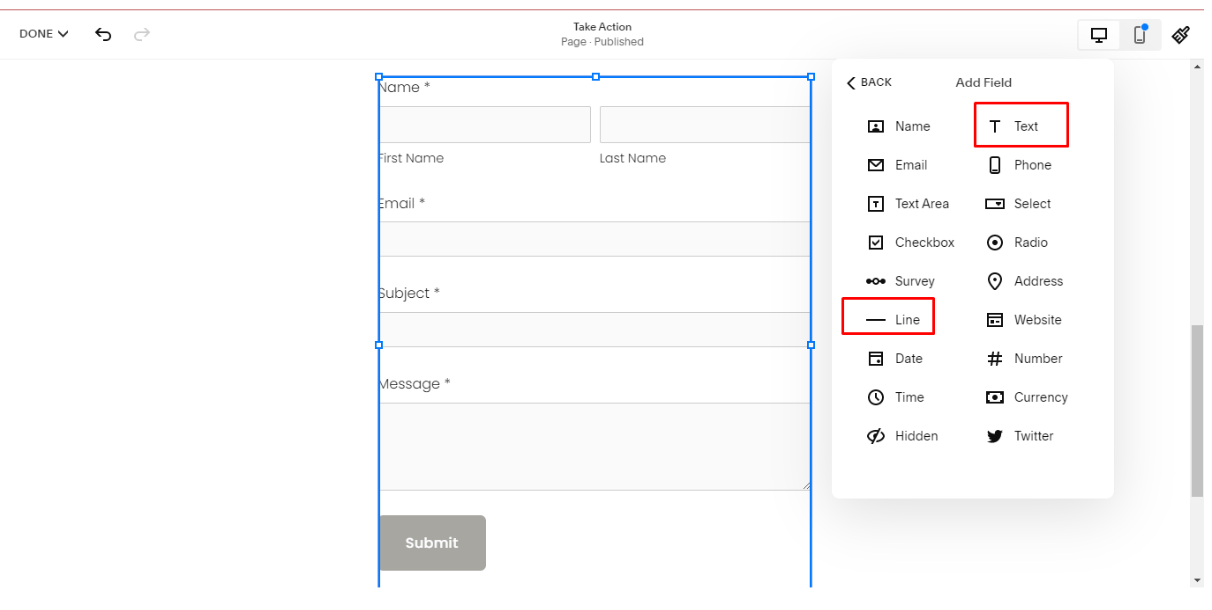
You can edit the form fields from the pop-up tab by selecting “Content” >>> “Edit Form Fields” >>> “ADD FIELD.”
Stage #2: Squarespace Form File Upload: Adding the File Upload Button
To add the Squarespace form file upload button, log in to your Dropbox account and select “File requests” from the left tab.
Next, select “New request,” follow the instructions to create your request, and copy the file request link.
Return to your Squarespace form and add a new “Text” or “Line” field.
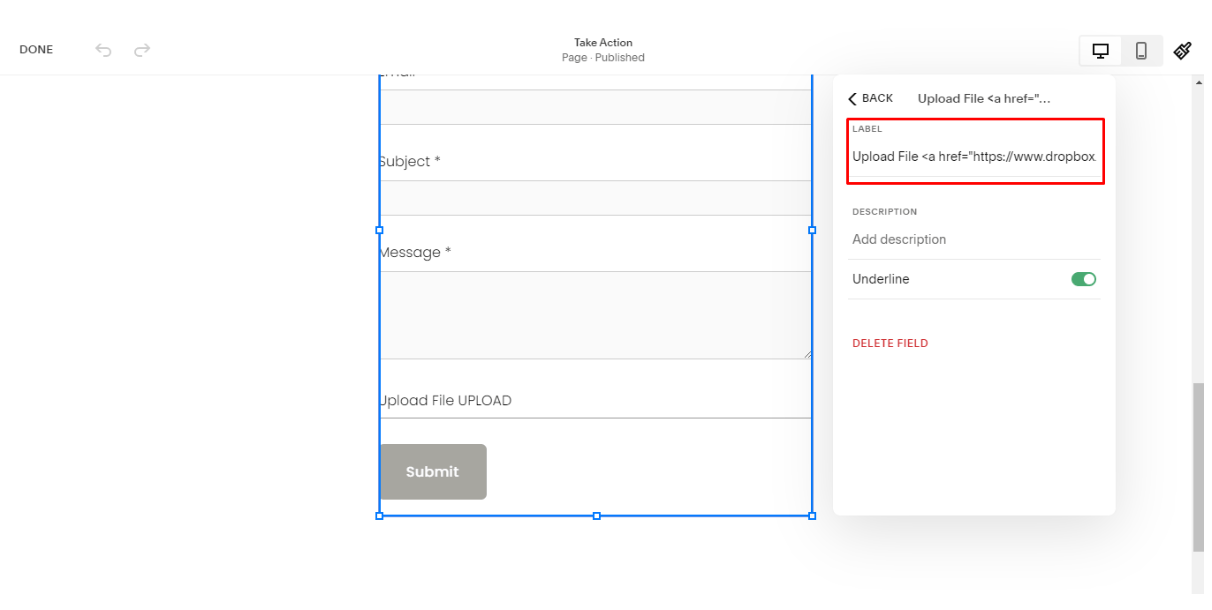
Select the new field you added to edit it. Now, in place of the label, copy and paste the following code while replacing DROPBOX URL with the file request URL you previously copied from your Dropbox account.
Upload File <a href="DROPBOX URL" class="upload" target="popup" onclick="window.open(’DROPBOX URL’,’popup’,’width=600,height=600’); return false;">UPLOAD</a>
Save your changes. Now, when you click on the new field you added, you should see a Dropbox pop-up.
Anytime a visitor uploads a file using the Dropbox feature, you should receive the file in the specified folder.
Note: Your visitors must still hit the Submit button if you require other responses besides the file upload. So, ensure to instruct them to do so.
Stage #3: Styling the Form (Optional)
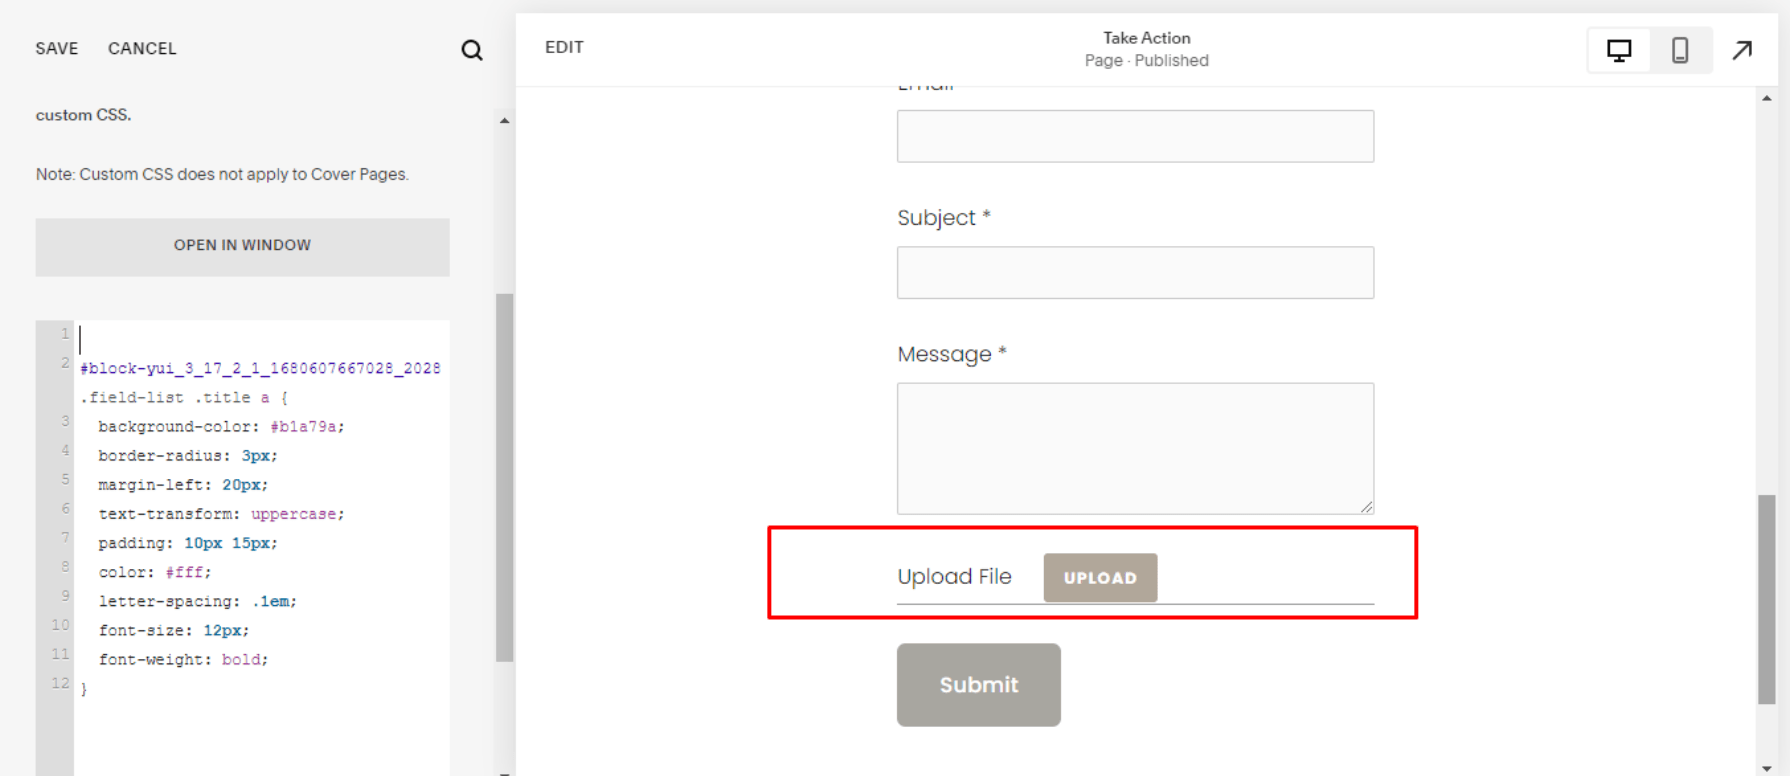
If you want to apply custom styles to the Squarespace form file upload button, you can do that easily with custom CSS. To do so, you must know the ID of the form of interest so that the styles only apply to that block. You can use this Chrome extension to see the ID of each Block and Section on your web page.
Now, navigate to “Design” >>> “Custom CSS” and paste the following CSS code if you use Squarespace version 7.1:
Upload File <a href="DROPBOX URL" class="upload" target="popup" onclick="window.open(’DROPBOX URL’,’popup’,’width=600,height=600’); return false;">UPLOAD</a>
And if you use Squarespace version 7.0, use the following CSS code instead:
Upload File <a href="DROPBOX URL" class="upload" target="popup" onclick="window.open(’DROPBOX URL’,’popup’,’width=600,height=600’); return false;">UPLOAD</a>
Note: Replace #block-ID with the specific block ID of the form on your page.
You can further tweak the style properties to your liking, but if you use the configurations in the above code, your Squarespace form file upload button should look like the one below.
You can conveniently add forms to your Squarespace site with the above steps. You must, however, optimize your Squarespace form file uploads to create a seamless experience for your site visitors.
Optimizing Your File Upload Form for Your Website Visitors
It’s essential to make your file upload form easily navigable for visitors to ensure they send the necessary information. This also improves the user experience, an essential criterion for search engine optimization (SEO).
Quick Facts: SEO is essential for website owners who desire success in their respective niche/industry, and our hand-picked Squarespace SEO tips are a great resource to get you started. That’s not all; we also have a free Squarespace SEO plugin to augment the default SEO features. Our recently published blog reveals Squarespace’s SEO capabilities aren’t as robust as competitors,’ but our plugin helps fix that.
That said, let’s examine three helpful tips for optimizing your Squarespace file upload form.
Tip #1: Limit size for file uploads.
If you don’t specify the size you’re looking for, people might upload large files that can take a long time to download. To ensure this doesn’t happen, specify the file size visitors can upload in your Squarespace form. This way, you can eliminate confusion, saving everyone’s time in the long run.
Tip #2: Organise file names.
Another way to streamline your file uploading and collection process is to ensure the files are named accordingly so you can easily track them. You should provide text fields within the form to collect the necessary details when adding the Squarespace form file upload button. This will help you determine which files belong to which visitor and/or category, enabling you to sort out any confusion surrounding other file uploads.
Tip #3: Be clear about your needs.
Finally, ensure that when creating the form, you’re clear about what type of information or documents you want from your visitors. For example, if you’re expecting PDFs only or JPG files only, let them know.
Besides the above tips for optimizing your Squarespace form file uploads, we’ve also listed some best practices for file management below.
Best Practices for Managing File Uploads in Squarespace Forms
Managing file uploads in Squarespace forms efficiently ensures a smooth workflow and a positive user experience.
Here are some best practices to keep in mind:
● Regularly download files: Make it a habit to regularly download and back up the files you receive. This ensures that you have a local copy of all the files, even if you were to lose your copies in the cloud.
● Notify clients: Consider setting up an automated email notification to let your clients know that you have received their files. This provides reassurance and keeps them informed about the progress of their submission.
● Protect data collected: Ensure that you comply with data privacy regulations when visitors upload files on your Squarespace site. If necessary, consider implementing additional security measures such as encryption or password protection for sensitive files.
These best practices allow you to effectively upload files and manage them in Squarespace forms and maintain a professional and efficient workflow. So, what are some common forms that can easily be uploaded to a Squarespace website? Check out the next section, where we share some key examples.
Examples of Creative Uses of the Squarespace File Upload Feature
The possibilities for using file uploads in Squarespace forms are endless.
Here are some creative examples to inspire you:
● Photography Portfolio: Allow potential clients to submit their photo requirements or inspiration shots through a file upload field. This helps you understand their vision and deliver a more tailored proposal.
● Event Planning: Enable file uploads for event planning inquiries, allowing clients to share venue layouts, mood boards, or any other relevant files. This helps you better understand their event needs and offer more accurate quotes.
● Product Customization: If you offer customizable products, let customers upload files of their designs or reference images. This ensures you have all the necessary files to create the desired product.
● Collaborative Projects: If you work with a team or freelancers, use file uploads to collect project files from collaborators. This centralizes the file-sharing process and ensures everyone has access to the most up-to-date files.
● Job Applications: Include a file upload field in your job application form to allow candidates to submit their resumes, cover letters, and portfolios. This simplifies the application process and ensures you have all the necessary documents.
These examples demonstrate the versatility of file uploads in Squarespace forms and how they can be used to enhance various aspects of your business. For more tips on Squarespace customization, check out our blog page.
Before you go: Consider using our Squarespace SEO plugin to supercharge your website’s rankings on search engines. SEO should be at the core of your practice as a growth-oriented business, as this is how you can generate inbound leads from organic traffic on Google. For ideas on how to optimize your website for SEO, check out our curated Squarespace SEO checklist!
Frequently Asked Questions about Squarespace Attach File to Form
Can you upload files on Squarespace forms?
Squarespace forms don’t support file attachments, but you can use external services like Dropbox or Google Drive to enable file uploads. Alternatively, you can create a custom form using a code block to allow file uploads, but this requires technical knowledge.
How do I upload large files to Squarespace?
To upload large files to Squarespace, you can either compress them before uploading or upload them to an alternative location (such as Google Drive) and link to them from your Squarespace site. Optimizing your files (e.g., images) can help improve your site’s loading speed and SEO performance.
What file type is best for Squarespace?
The best file types for Squarespace depend on the type of uploaded content. JPEGs are generally best for images, except for images with text that may lose quality, in which case PNGs may be better. PNG or ICO files are recommended for logos and icons, particularly with a transparent background.
How do I allow customers to upload files to Squarespace?
To allow customers to upload files to your Squarespace site, you can use Dropbox's File Request feature. To do that, you can create a form on your Squarespace page and then add a text or line field with instructions for file uploads.
How do I create a submission form in Squarespace?
To create a submission form in Squarespace, you can simply add a form block to your desired page or post. You can also customise it by naming your form, adjusting the submit button, and adding the fields you need to gather information from visitors.
Wrapping It Up
Whether you’re an average Squarespace site owner looking for a hassle-free way to collect file uploads or a web developer seeking a simple file collection solution, creating an easy-to-use file upload form on Squarespace is now possible with the Dropbox File Request feature. Namely, you can have a customized Squarespace form for file uploading that’s easy to incorporate into your website.
Besides mastering Squarespace form creation for file upload, you may also like our foolproof guide for web designers to get web design clients.
While at it, remember that SEO is a critical factor for the success of any online business. So, always adhere to our Squarespace SEO checklist when creating web content. And if you need help getting started with SEO, we’re offering a free website SEO audit.


